David Baxter PhD
Late Founder
Build a complete Windows 7 safety net
By Fred Langa, Windows Secrets
May 12, 2011
Every copy of Windows 7 includes a complete suite of backup tools. The suite contains everything you need to back up (and restore) your entire system.
What?s more, after you?ve set up your initial backup, future backups happen automatically.
In fact, Windows 7 makes it so easy to set up fully automated backups, it?s almost nutty not to do it.
But (you knew there had to be one) Windows 7′s backup tools are based on a different philosophy than previous versions of Windows and so do not operate exactly as you might expect. Until you understand what Microsoft is trying to do, the differences can be confusing.
Win7′s backup system has three major parts
The first component is designed to protect a system?s user data ? and nothing else. User data includes each user?s locally stored library files plus the contents of the user folders and subfolders, such as AppData, Contacts, Desktop, Documents, Downloads, Favorites, Links, Music, Pictures, Saved Games, Searches, and Videos.
Those folders contain a system?s most valuable and rapidly changing data files ? after all, your user files include all your documents, spreadsheets, e-mails, and so on. These are the files that need the most careful and frequent backups. As a result, the Windows 7 backup puts most of its emphasis on automatically protecting these files.
But the Windows 7 primary backup applet does not ? repeat, does not ? back up system folders or program files, even if you specifically select them or if they?re inside a folder that?s otherwise being backed up. The user-data backup process specifically excludes program files.
Win7 includes a second tool ? a system-imaging app ? to back up system folders, installed programs, and the like. Microsoft?s theory is that these less frequently changing files don?t need to be backed up as often as user data. That?s not unreasonable.
A system image is the gold standard of backups. It?s an exact digital copy of the complete contents and logical structure of your hard drive. You can use a system image to restore a PC to full running order, with all your software set up and ready for immediate use. When you restore a system image, you put your PC back to exactly the way it was at the moment the system image was made.
You need to make a new system image only when your system changes in some major way (a major new software update, or whatever). It?s a low-frequency task.
When you run a Win7 backup for the first time, you?ll automatically be prompted to make your first system image. It?s part of the initial backup process, built-in, and very easy to do.
The third and final component of the Win7 backup system is a bootable System Recovery Disk. With the recovery disk, you can restore your system even if the hard drive is otherwise completely unbootable. Making the System Recovery Disk is automatic; you?ll be prompted at the right time.
In a moment, I?ll walk you through a complete, three-part, Win7 initial backup.
Windows Vista and XP backup and imaging
Win7′s backup tools evolved from Vista?s. Many of the techniques described in this article also work on Vista PCs. If you need more information, see Microsoft?s Vista backup/restore FAQ or the more general Vista Safety and security page.
XP?s tools are completely different, but you can back up and image XP systems, too. Many of the very best XP-maintenance tips, techniques, and free tools ? including XP backup and imaging options ? are collected for you in the August 12, 2010, Top Story, ?Preparing Windows XP for the long haul,? and in the November 11, 2010, Top Story, ?Windows XP: Looking back, looking forward.?
Step one: Setting up your initial backup
Naturally, your backups will consume some disk space and/or blank CDs or DVDs. The exact amount depends entirely on your local setup, but you can use this ballpark guide:
Estimate the size of your initial User Data backup by right-clicking on a username folder ? e.g., C:Usersusername. Select Properties and note the size. Your initial backup will be no larger than this amount and will most likely be somewhat smaller (because not everything gets copied). Future backups are smaller still because they?ll include only files that have changed since the previous backup.
The system-image tool backs up an entire drive ? for example, your full C: drive. But it doesn?t back up empty space (what would be the point?), and it compresses what it does back up ? typically by 30 percent to 50 percent. If you have a drive containing 50GB of actual data, a system image of that drive would probably end up being 25GB to 35GB in size.
Whatever device you back up to (typically, an external USB hard drive or network-attached drive), make sure it has plenty of free space for future incremental and image backups. (Win7′s backup tools will guide you toward storage locations with the right sizes and attributes. More on that below.)
The System Recovery Disc uses just a single CD or DVD.
Once you?re ready to get started, simply click the Start orb, type the word backup in the Search programs and files box, and press Enter. This works on any Win7 (or Vista) PC.
If you prefer the all-mouse approach: click the Start orb, open Control Panel, and (if in the Control Panel?s default view) select Backup and Restore from the System and Security category.
Whichever way you get there, the Backup or Restore your files applet initially opens a dialog box like that shown in Figure 1. This dialog box gives you centralized access to all of Win7′s major backup tools.
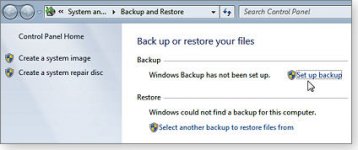
Figure 1. Win7′s Backup or Restore your files applet gives you integrated access to all of the OS?s built-in backup tools.
The first time through, click Set up backup. After a moment, you?ll see the dialog box shown in Figure 2, and you?ll hear your mechanical drives buzz and chatter. Don?t worry; the backup has not started without you! The backup software is merely learning what drives are available for later access.
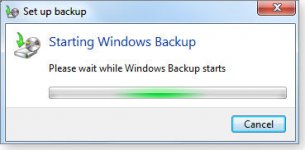
Figure 2. This somewhat misleading dialog box is not actually starting the backup.
► Choose where your backups will be stored. After a few moments, your system will quiet down and a new dialog box opens to let you select the destination for the backup files you?re about to create.
Windows places the word Recommended next to the location it thinks is best, but you?re free to select other locations. For more information, see Microsoft?s Win7 Help & How-to page, ?Where should I save my backup?? On the system shown in Figure 3, Win7 offers to save backups to a D drive, a DVD burner, or an external 1-TB drive. Naturally, your PC?s options will be different.
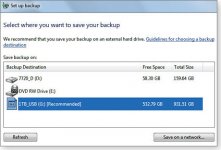
Figure 3. Win7 displays acceptable backup locations and offers its recommendation.
(Note: Windows 7 Pro, Ultimate, and Enterprise also offer a Save on a network ? option button, as shown in Figure 3.)
When you?ve chosen a destination for your backup files, click Next.
► Now choose which files to back up. The What do you want to back up dialog box, shown in Figure 4, lets you accept Windows? defaults for what to back up, or it allows you to make your own selections.
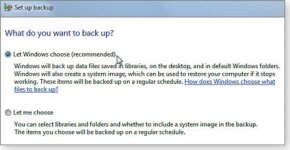
Figure 4. Windows can automatically choose what it thinks should be backed up ? or you can make the selections manually.
If you select Let Windows choose, Win7 backs up all user data folders and files, as listed earlier. This is usually a good choice. (See Microsoft?s article, ?How does Windows choose which files to back up??)
If you select Let me choose, you see the dialog box shown in Figure 5. (This option is most useful when you?ve set up your system in a nonstandard way, with user files in nondefault locations.)
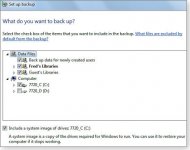
Figure 5. The Let me choose option lets you manually specify individual folders, libraries, or drives to include in the backup.
But remember that the Windows 7 backup tool does not back up program files or system folders, even if you manually select them. There?s a separate tool for that, which we?re coming to.
Once you?ve made your choice, click Next.
► Review your settings; run the backup. Figure 6 shows the review dialog box for a typical Let Windows decide backup. (That?s the option I usually choose.) The Let me decide confirmation dialog box looks very similar.
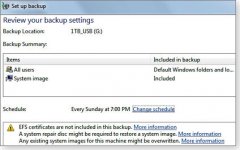
Figure 6. A review dialog box lets you confirm that the backup is set up the way you intend.
Note the Schedule information in the middle of the dialog box shown in Figure 7. By default, Windows uses the settings you?re now establishing to perform a weekly backup of your system?s user data. You can modify the schedule via the Change schedule link; it opens a separate window, so you won?t lose your place on the main backup dialog box.
Similarly, you can explore any warnings displayed at the bottom of the dialog box by clicking on the More information links. They also open secondary windows, so you won?t lose your place.
If anything about the backup isn?t correct, click the dialog?s Cancel button and start over.
When everything is OK, click Save settings and run backup. Now the actual backup begins, as shown in Figures 7 and 8.
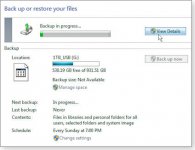
Figure 7. The status screen of a backup in progress
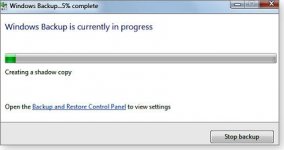
Figure 8. The View Details window lets you see what the backup is doing, step by step and file by file.
You can minimize the backup windows and continue to use your PC while the backup runs, but I don?t recommend it. Backups are inherently disc- and CPU-intensive and tend to bog a system down. It?s usually better to let the backup run when the PC would otherwise be idle.
Step two: Create a full-system image
When the first user-data backup completes, Windows normally offers to create a system image via a dialog box like the one shown in Figure 9, which is the first of several poorly worded dialog boxes; it refers to a backup when it should say image. (Hey, Microsoft! Hire some proofreaders, OK?)
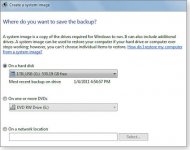
Figure 9. Although it asks, ?Where do you want to save the backup?? it?s really asking where to store the system image, as the rest of the dialog box?s text indicates.
You can accept the default location or choose something different. In planning where to put the image files, note that they?re large and usually end up being around 50 percent to 70 percent of the size of the original, uncompressed data.
Once you?ve selected where the system image will be stored, you?ll be asked what to include in the image. (See Figure 10.) This dialog box repeats the backup-for-image error. (Sheesh, Microsoft!)
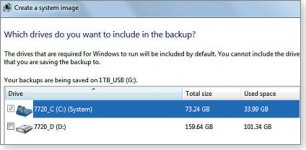
Figure 10. Select the drive(s) you want to image.
A confirmation dialog box lets you double-check your choices, as you can see in Figure 11. Windows shows you an uncompressed, worst-case, maximum-size estimate for the image files, so you can make sure there?s room in the selected destination or that you have a sufficient number of blank CDs or DVDs on hand.
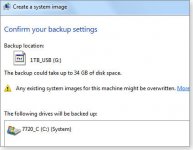
Figure 11. Review your imaging choices in this confirmation dialog box.
Click the Start backup button to start the disc-imaging process. (Fortunately, that?s the last language-mangled dialog box in this series.)
Step three: Create a System Repair boot disc
When the system image completes, you?ll be offered the option to make a System Repair boot disc, which is the third and final piece of the Windows 7 backup strategy. (See Figure 12.)
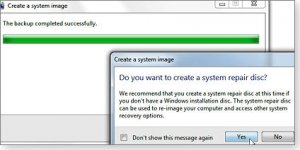
Figure 12. It?s well worth the short time and extra CD or DVD to create a System Repair disk.
Just follow the prompts; it takes only a couple of minutes, tops.
You already paid for these tools. So use ?em!
Yes, setting up backups takes some time ? probably a few hours, the first time through. And yes, the tools aren?t elegant.
But they get the job done, all your data will be backed up, your program and system files will be safely and separately backed up, and you?ll have a bootable Recovery CD on hand.
From here on out, the Backup Scheduler takes over and safeguards your user data through automatic backups on whatever schedule you authorized.
Breathe a sigh of relief: Your system and data are protected against the disaster you know is coming!
Fred Langa is a senior editor of the Windows Secrets Newsletter. He was formerly editor of Byte Magazine (1987-91), editorial director of CMP Media (1991-97), and editor of the LangaList e-mail newsletter from its origin in 1997 until its merger with Windows Secrets in November 2006.
By Fred Langa, Windows Secrets
May 12, 2011
Every copy of Windows 7 includes a complete suite of backup tools. The suite contains everything you need to back up (and restore) your entire system.
What?s more, after you?ve set up your initial backup, future backups happen automatically.
In fact, Windows 7 makes it so easy to set up fully automated backups, it?s almost nutty not to do it.
But (you knew there had to be one) Windows 7′s backup tools are based on a different philosophy than previous versions of Windows and so do not operate exactly as you might expect. Until you understand what Microsoft is trying to do, the differences can be confusing.
Win7′s backup system has three major parts
The first component is designed to protect a system?s user data ? and nothing else. User data includes each user?s locally stored library files plus the contents of the user folders and subfolders, such as AppData, Contacts, Desktop, Documents, Downloads, Favorites, Links, Music, Pictures, Saved Games, Searches, and Videos.
Those folders contain a system?s most valuable and rapidly changing data files ? after all, your user files include all your documents, spreadsheets, e-mails, and so on. These are the files that need the most careful and frequent backups. As a result, the Windows 7 backup puts most of its emphasis on automatically protecting these files.
But the Windows 7 primary backup applet does not ? repeat, does not ? back up system folders or program files, even if you specifically select them or if they?re inside a folder that?s otherwise being backed up. The user-data backup process specifically excludes program files.
Win7 includes a second tool ? a system-imaging app ? to back up system folders, installed programs, and the like. Microsoft?s theory is that these less frequently changing files don?t need to be backed up as often as user data. That?s not unreasonable.
A system image is the gold standard of backups. It?s an exact digital copy of the complete contents and logical structure of your hard drive. You can use a system image to restore a PC to full running order, with all your software set up and ready for immediate use. When you restore a system image, you put your PC back to exactly the way it was at the moment the system image was made.
You need to make a new system image only when your system changes in some major way (a major new software update, or whatever). It?s a low-frequency task.
When you run a Win7 backup for the first time, you?ll automatically be prompted to make your first system image. It?s part of the initial backup process, built-in, and very easy to do.
The third and final component of the Win7 backup system is a bootable System Recovery Disk. With the recovery disk, you can restore your system even if the hard drive is otherwise completely unbootable. Making the System Recovery Disk is automatic; you?ll be prompted at the right time.
In a moment, I?ll walk you through a complete, three-part, Win7 initial backup.
Windows Vista and XP backup and imaging
Win7′s backup tools evolved from Vista?s. Many of the techniques described in this article also work on Vista PCs. If you need more information, see Microsoft?s Vista backup/restore FAQ or the more general Vista Safety and security page.
XP?s tools are completely different, but you can back up and image XP systems, too. Many of the very best XP-maintenance tips, techniques, and free tools ? including XP backup and imaging options ? are collected for you in the August 12, 2010, Top Story, ?Preparing Windows XP for the long haul,? and in the November 11, 2010, Top Story, ?Windows XP: Looking back, looking forward.?
Step one: Setting up your initial backup
Naturally, your backups will consume some disk space and/or blank CDs or DVDs. The exact amount depends entirely on your local setup, but you can use this ballpark guide:
Estimate the size of your initial User Data backup by right-clicking on a username folder ? e.g., C:Usersusername. Select Properties and note the size. Your initial backup will be no larger than this amount and will most likely be somewhat smaller (because not everything gets copied). Future backups are smaller still because they?ll include only files that have changed since the previous backup.
The system-image tool backs up an entire drive ? for example, your full C: drive. But it doesn?t back up empty space (what would be the point?), and it compresses what it does back up ? typically by 30 percent to 50 percent. If you have a drive containing 50GB of actual data, a system image of that drive would probably end up being 25GB to 35GB in size.
Whatever device you back up to (typically, an external USB hard drive or network-attached drive), make sure it has plenty of free space for future incremental and image backups. (Win7′s backup tools will guide you toward storage locations with the right sizes and attributes. More on that below.)
The System Recovery Disc uses just a single CD or DVD.
Once you?re ready to get started, simply click the Start orb, type the word backup in the Search programs and files box, and press Enter. This works on any Win7 (or Vista) PC.
If you prefer the all-mouse approach: click the Start orb, open Control Panel, and (if in the Control Panel?s default view) select Backup and Restore from the System and Security category.
Whichever way you get there, the Backup or Restore your files applet initially opens a dialog box like that shown in Figure 1. This dialog box gives you centralized access to all of Win7′s major backup tools.

Figure 1. Win7′s Backup or Restore your files applet gives you integrated access to all of the OS?s built-in backup tools.
The first time through, click Set up backup. After a moment, you?ll see the dialog box shown in Figure 2, and you?ll hear your mechanical drives buzz and chatter. Don?t worry; the backup has not started without you! The backup software is merely learning what drives are available for later access.

Figure 2. This somewhat misleading dialog box is not actually starting the backup.
► Choose where your backups will be stored. After a few moments, your system will quiet down and a new dialog box opens to let you select the destination for the backup files you?re about to create.
Windows places the word Recommended next to the location it thinks is best, but you?re free to select other locations. For more information, see Microsoft?s Win7 Help & How-to page, ?Where should I save my backup?? On the system shown in Figure 3, Win7 offers to save backups to a D drive, a DVD burner, or an external 1-TB drive. Naturally, your PC?s options will be different.

Figure 3. Win7 displays acceptable backup locations and offers its recommendation.
(Note: Windows 7 Pro, Ultimate, and Enterprise also offer a Save on a network ? option button, as shown in Figure 3.)
When you?ve chosen a destination for your backup files, click Next.
► Now choose which files to back up. The What do you want to back up dialog box, shown in Figure 4, lets you accept Windows? defaults for what to back up, or it allows you to make your own selections.

Figure 4. Windows can automatically choose what it thinks should be backed up ? or you can make the selections manually.
If you select Let Windows choose, Win7 backs up all user data folders and files, as listed earlier. This is usually a good choice. (See Microsoft?s article, ?How does Windows choose which files to back up??)
If you select Let me choose, you see the dialog box shown in Figure 5. (This option is most useful when you?ve set up your system in a nonstandard way, with user files in nondefault locations.)

Figure 5. The Let me choose option lets you manually specify individual folders, libraries, or drives to include in the backup.
But remember that the Windows 7 backup tool does not back up program files or system folders, even if you manually select them. There?s a separate tool for that, which we?re coming to.
Once you?ve made your choice, click Next.
► Review your settings; run the backup. Figure 6 shows the review dialog box for a typical Let Windows decide backup. (That?s the option I usually choose.) The Let me decide confirmation dialog box looks very similar.

Figure 6. A review dialog box lets you confirm that the backup is set up the way you intend.
Note the Schedule information in the middle of the dialog box shown in Figure 7. By default, Windows uses the settings you?re now establishing to perform a weekly backup of your system?s user data. You can modify the schedule via the Change schedule link; it opens a separate window, so you won?t lose your place on the main backup dialog box.
Similarly, you can explore any warnings displayed at the bottom of the dialog box by clicking on the More information links. They also open secondary windows, so you won?t lose your place.
If anything about the backup isn?t correct, click the dialog?s Cancel button and start over.
When everything is OK, click Save settings and run backup. Now the actual backup begins, as shown in Figures 7 and 8.

Figure 7. The status screen of a backup in progress

Figure 8. The View Details window lets you see what the backup is doing, step by step and file by file.
You can minimize the backup windows and continue to use your PC while the backup runs, but I don?t recommend it. Backups are inherently disc- and CPU-intensive and tend to bog a system down. It?s usually better to let the backup run when the PC would otherwise be idle.
Step two: Create a full-system image
When the first user-data backup completes, Windows normally offers to create a system image via a dialog box like the one shown in Figure 9, which is the first of several poorly worded dialog boxes; it refers to a backup when it should say image. (Hey, Microsoft! Hire some proofreaders, OK?)

Figure 9. Although it asks, ?Where do you want to save the backup?? it?s really asking where to store the system image, as the rest of the dialog box?s text indicates.
You can accept the default location or choose something different. In planning where to put the image files, note that they?re large and usually end up being around 50 percent to 70 percent of the size of the original, uncompressed data.
Once you?ve selected where the system image will be stored, you?ll be asked what to include in the image. (See Figure 10.) This dialog box repeats the backup-for-image error. (Sheesh, Microsoft!)

Figure 10. Select the drive(s) you want to image.
A confirmation dialog box lets you double-check your choices, as you can see in Figure 11. Windows shows you an uncompressed, worst-case, maximum-size estimate for the image files, so you can make sure there?s room in the selected destination or that you have a sufficient number of blank CDs or DVDs on hand.

Figure 11. Review your imaging choices in this confirmation dialog box.
Click the Start backup button to start the disc-imaging process. (Fortunately, that?s the last language-mangled dialog box in this series.)
Step three: Create a System Repair boot disc
When the system image completes, you?ll be offered the option to make a System Repair boot disc, which is the third and final piece of the Windows 7 backup strategy. (See Figure 12.)

Figure 12. It?s well worth the short time and extra CD or DVD to create a System Repair disk.
Just follow the prompts; it takes only a couple of minutes, tops.
You already paid for these tools. So use ?em!
Yes, setting up backups takes some time ? probably a few hours, the first time through. And yes, the tools aren?t elegant.
But they get the job done, all your data will be backed up, your program and system files will be safely and separately backed up, and you?ll have a bootable Recovery CD on hand.
From here on out, the Backup Scheduler takes over and safeguards your user data through automatic backups on whatever schedule you authorized.
Breathe a sigh of relief: Your system and data are protected against the disaster you know is coming!
Fred Langa is a senior editor of the Windows Secrets Newsletter. He was formerly editor of Byte Magazine (1987-91), editorial director of CMP Media (1991-97), and editor of the LangaList e-mail newsletter from its origin in 1997 until its merger with Windows Secrets in November 2006.
