David Baxter PhD
Late Founder
How to add a Brightness Slider to Windows 10
by Hemant Saxena, WindowsClub.com
December 10, 2017
A disappointing feature introduced in Windows 10 v1709 was the change in the way to handle the screen brightness. A button in the Action Center that steps up in 25% increments was just not the right solution users expected. The pre-set brightness toggle made it quite uneasy and difficult to set the appropriate brightness level. Fortunately, there are always 3rd party apps to come to our rescue in such a case. Windows 10 Monitor Brightness Slider is one such handy utility that lets you add a Brightness Slider to Windows 10.
Windows 10 Monitor Brightness Slider

There?s no direct way to replace the Windows 10 screen brightness toggle found under Action Center with a slider. Also, the option is quite bothering since it cycles through 25, 50, 75, and 100% brightness with no option for anything in between.
An option to access the slider does exist, but one has to trace a long path for it ? selecting Start > Settings > System > Display. Then, under Brightness and color, adjust the ?Change brightness? slider to fix the brightness. Windows 10 Monitor Brightness Slider cuts short this process completely. The free app simply adds a volume-like slider to change monitor brightness. In addition to this, it also puts a screen brightness icon on the taskbar space to enable quick access.
How to add a Brightness Slider to Windows 10
First, visit Brightness Slider?s official page and hit the Download button visible at the bottom of the page.
The download size of the file is small, only 63 KB. Once downloaded, double-click the file to add a little sun icon in your System Tray. If you don?t see it, click the small arrow next to the row of icons to find it.
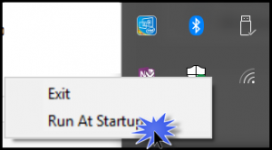
Now, just access the icon to adjust the screen brightness as per your preference. A good feature about the app is that it won?t run at startup by default. So, if you would like the app to be always available, right-click the app icon and select ?Run at Startup? option just below ?Exit?.

by Hemant Saxena, WindowsClub.com
December 10, 2017
A disappointing feature introduced in Windows 10 v1709 was the change in the way to handle the screen brightness. A button in the Action Center that steps up in 25% increments was just not the right solution users expected. The pre-set brightness toggle made it quite uneasy and difficult to set the appropriate brightness level. Fortunately, there are always 3rd party apps to come to our rescue in such a case. Windows 10 Monitor Brightness Slider is one such handy utility that lets you add a Brightness Slider to Windows 10.
Windows 10 Monitor Brightness Slider

There?s no direct way to replace the Windows 10 screen brightness toggle found under Action Center with a slider. Also, the option is quite bothering since it cycles through 25, 50, 75, and 100% brightness with no option for anything in between.
An option to access the slider does exist, but one has to trace a long path for it ? selecting Start > Settings > System > Display. Then, under Brightness and color, adjust the ?Change brightness? slider to fix the brightness. Windows 10 Monitor Brightness Slider cuts short this process completely. The free app simply adds a volume-like slider to change monitor brightness. In addition to this, it also puts a screen brightness icon on the taskbar space to enable quick access.
How to add a Brightness Slider to Windows 10
First, visit Brightness Slider?s official page and hit the Download button visible at the bottom of the page.
The download size of the file is small, only 63 KB. Once downloaded, double-click the file to add a little sun icon in your System Tray. If you don?t see it, click the small arrow next to the row of icons to find it.
Now, just access the icon to adjust the screen brightness as per your preference. A good feature about the app is that it won?t run at startup by default. So, if you would like the app to be always available, right-click the app icon and select ?Run at Startup? option just below ?Exit?.


